Screenshot On Dell Laptop – A Comprehensive Guide!
Learn how to take a screenshot on a Dell laptop using simple methods like Print Screen, Snipping Tool, Snip & Sketch, or third-party apps.
In this article, we’ll show you various ways to take a screenshot on a Dell laptop, including using the Print Screen key, Snipping Tool, and Snip & Sketch. We’ll also explore advanced methods with third-party tools and answer common questions. Learn how to capture, edit, and save your screenshots effortlessly!
Why Screenshots Are Useful
Screenshots serve various purposes, such as:
- Capturing errors or issues for troubleshooting.
- Saving visuals from online presentations or meetings.
- Sharing gaming achievements.
- Documenting information from web pages or software.
Let’s explore the different ways to take screenshots on a Dell laptop, including using built-in features and external tools.
Method 1: Using the Print Screen (PrtScn) Key
The Print Screen (PrtScn) key is one of the simplest and most widely used methods for taking screenshots.
Locate the PrtScn Key: On Dell laptops, the key is usually labeled as PrtScn, PrntScrn, or something similar, and is located in the top row of the keyboard.
Capture the Screen:
- Press the PrtScn key. This captures the entire screen and copies it to your clipboard.
Paste the Screenshot:
- Open a program like Paint, Word, or PowerPoint.
- Press Ctrl + V to paste the screenshot.
Save the Image:
- In Paint, go to File > Save As, choose your preferred format (e.g., JPEG, PNG), and save the file.
Pro Tip: If your Dell laptop has an Fn key, you might need to press Fn + PrtScn to capture the screen.
Read More: How To Use Laptop As Monitor – A Complete Guide!
Method 2: Capture Active Window
If you only want to capture a specific window instead of the entire screen, follow these steps.
Steps:
Open the Desired Window: Ensure the window you want to capture is active.
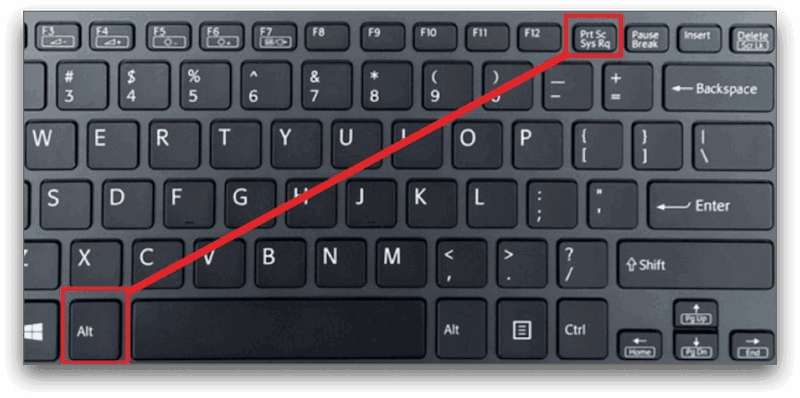
Press Alt + PrtScn:
- This captures only the active window and copies it to the clipboard.
Paste and Save:
- Open Paint or another editing program, paste the screenshot with Ctrl + V, and save it.
Method 3: Using the Snipping Tool
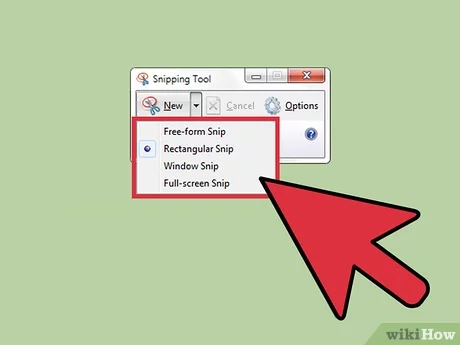
The Snipping Tool is a built-in screenshot utility available in most Windows versions.
Steps:
Open Snipping Tool:
- Click on the Start menu and search for Snipping Tool.
Choose a Snip Mode:
- Options include Free-form Snip, Rectangular Snip, Window Snip, and Full-screen Snip.
Take the Screenshot:
- Drag the cursor to select the area to capture.
Save the Snip:
- Click File > Save As, choose the format and location, and save.
Pro Tip: For frequent use, pin the Snipping Tool to your taskbar.
Read More: How To Turn Surface Laptop Into Monitor – A Step-by-Step Guide!
Method 4: Using Snip & Sketch (Windows 10 and 11)
For Dell laptops running Windows 10 or 11, the Snip & Sketch tool offers more advanced options.
Steps:
Open Snip & Sketch:
- Press Windows + Shift + S to open the snipping toolbar.
Choose a Snip Mode:
- Options include Rectangular Snip, Freeform Snip, Window Snip, and Full-screen Snip.
Capture the Area:
- Select the desired area with your cursor.
Edit and Save:
- The screenshot appears in the Snip & Sketch editor, where you can annotate or crop it.
- Click Save to store the screenshot.
Method 5: Windows Key + PrtScn Shortcut
This method instantly saves a screenshot without the need to paste it elsewhere.
Steps:
Press Windows + PrtScn:
- The screen dims momentarily, indicating the screenshot has been taken.
Locate the Screenshot:
- Go to File Explorer and navigate to Pictures > Screenshots.
Best For:
- Capturing the entire screen quickly.
- Users who prefer saving screenshots directly to a folder.
Method 6: Using Third-Party Screenshot Tools
If you need advanced features, third-party tools offer more customization and functionality.
Popular Tools:
Lightshot:
- Lightweight and user-friendly, Lightshot lets you edit and upload screenshots online.
Greenshot:
- Offers features like annotations, cropping, and direct sharing to cloud storage.
Snagit:
- A premium tool for professional screenshots and screen recordings.
Read More:Gaming Laptop Can’t Handle Google Chrome – Solutions Inside!
Steps:
- Download and install your preferred tool.
- Follow the on-screen instructions to capture and edit screenshots.
Method 7: Screenshots on Touchscreen Dell Laptops
If you have a touchscreen Dell laptop, taking screenshots can be even easier.
Steps:
Swipe and Capture:
- Use the Snip & Sketch tool by swiping in from the right edge and tapping Screen snip.
Annotate and Save:
- Edit the screenshot in the Snip & Sketch editor and save it.
Method 8: Using Microsoft PowerPoint or Word for Direct Screenshot Insertion
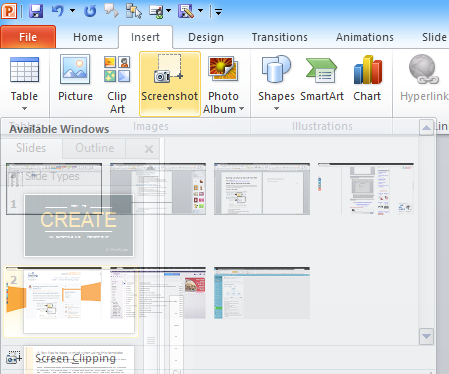
If you’re working on a presentation or document, you can directly insert screenshots using Microsoft Office tools.
Steps in PowerPoint or Word:
- Open your document or presentation.
- Go to the Insert tab in the toolbar.
- Select Screenshot or Screen Clipping.
- Choose the desired window or area to insert the screenshot directly.
This method eliminates the need to save and import screenshots separately, saving time during document creation.
Method 9: Taking a Delayed Screenshot
Sometimes, you may need a few seconds to set up the screen before capturing it. Both the Snipping Tool and Snip & Sketch provide delayed screenshot options.
Steps:
- Open the Snipping Tool or Snip & Sketch.
- Click on the drop-down menu next to the New button (Snipping Tool) or the Delay option (Snip & Sketch).
- Choose a delay time (e.g., 3, 5, or 10 seconds).
- Prepare your screen, and the tool will automatically capture the screenshot after the set delay.
This is especially helpful for capturing menus, tooltips, or pop-ups.
Read More:Facebook Messenger On Laptop Will Not Upload Graphics – Quick Fix Guide!
Troubleshooting Common Screenshot Issues:
PrtScn Key Not Working:
- Ensure your keyboard drivers are updated.
- Check if the Fn key is required with PrtScn.
Screenshots Not Saving:
- Verify the file location in the Screenshots folder.
- Check for sufficient storage space.
Snipping Tool Missing:
- Update your Windows OS to the latest version.
Tips for Effective Screenshot Usage:
- Keep Files Organized: Use descriptive names and save screenshots in relevant folders.
- Leverage Cloud Storage: Upload screenshots to services like Google Drive or Dropbox for easy access.
- Use Annotations: Highlight or annotate important sections for presentations or tutorials.
FAQ’s
1. How do I take a screenshot on my Dell laptop using the keyboard?
Press the PrtScn key to capture the screen. Use Ctrl + V to paste it into a program like Paint or Word.
2. What is the Snipping Tool on a Dell laptop?
The Snipping Tool is a built-in Windows application that allows you to take screenshots of selected areas or the entire screen.
3. Where are screenshots saved on a Dell laptop?
Screenshots taken with Windows + PrtScn are saved in the Pictures > Screenshots folder. Others need to be saved manually.
4. Can I take a delayed screenshot on a Dell laptop?
Yes, use the Snipping Tool or Snip & Sketch to set a delay before capturing the screen.
5. What are the best third-party apps for screenshots on Dell laptops?
Popular apps include Lightshot, Snagit, and Greenshot for advanced screenshot editing and sharing
Conclusion:
Capturing screenshots on a Dell laptop is straightforward, thanks to the variety of built-in tools and shortcuts available. Whether you prefer using the PrtScn key, Snip & Sketch, or a third-party app, the method you choose depends on your specific needs.

