How To Screenshot On Asus Laptop – A Complete Guide!
Capture screenshots on your ASUS laptop using shortcuts like `PrtScn` or Snip & Sketch. Learn full, partial, and scrolling screenshots with step-by-step instructions.
In this article, we guide you through various methods to take screenshots on an ASUS laptop, using keyboard shortcuts like `PrtScn` and tools like Snip & Sketch. You’ll learn how to capture full screens, specific areas, and even scrolling windows. We also cover third-party tools for advanced screenshot options, ensuring you have all the tips you need.
Using Keyboard Shortcuts to Screenshot on ASUS Laptop:

One of the quickest and easiest ways to take a screenshot on an ASUS laptop is by using keyboard shortcuts. These methods work well across different models running Windows 10 or Windows 11.
1. Print Screen (PrtScn) Method:
The PrtScn button on your keyboard is a simple and effective way to capture a screenshot of your entire screen.
Here’s how to use it:
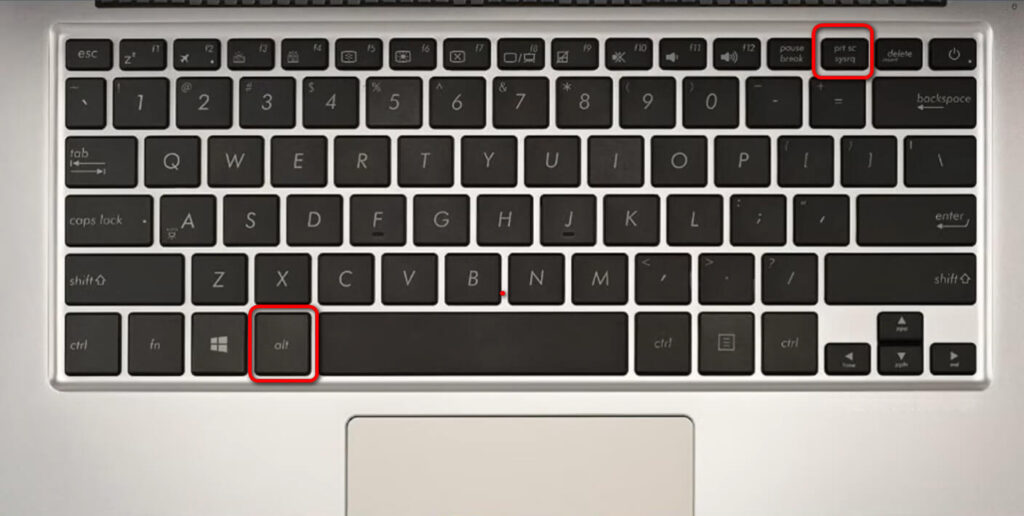
- Step 1: Locate the PrtScn key on your keyboard (usually found on the top row, near the F12 key).
- Step 2: Press the PrtScn key. This will copy the entire screen to your clipboard.
- Step 3: Open an image editor like Microsoft Paint or Word.
- Step 4: Paste the screenshot by pressing Ctrl + V or by right-clicking and selecting “Paste.”
- Step 5: Save the image by clicking on “File” and then “Save As.”
This method doesn’t save the screenshot directly as a file but copies it to your clipboard. You can then paste it into an application of your choice.
2. Alt + Print Screen (PrtScn) Method:
If you only want to capture the active window, rather than the entire screen, use this shortcut:
- Step 1: Open the window you want to capture.
- Step 2: Press Alt + PrtScn. This will capture only the active window and copy it to your clipboard.
- Step 3: Follow the same steps as above to paste and save your screenshot.
This is particularly useful if you’re working with multiple open windows and only need to capture one of them.
3. Windows Key + Print Screen (PrtScn) Method:
This method is perfect if you want to automatically save your screenshot as a file without needing to paste it somewhere first.
- Step 1: Press Windows Key + PrtScn.
- Step 2: Your screen will briefly dim, indicating that the screenshot was taken.
- Step 3: The screenshot will be saved directly in the “Screenshots” folder, located in your Pictures library (C:\Users\YourUsername\Pictures\Screenshots).
This method is fast and convenient, as it bypasses the need to paste your image manually into a program.
Using Snipping Tool or Snip & Sketch:
For more control over your screenshots, ASUS laptops with Windows 10 or 11 come with built-in screenshot tools like Snipping Tool and Snip & Sketch. These tools allow you to capture specific portions of the screen or create a delay before capturing.
1. How to Use Snipping Tool:
Snipping Tool has been around for a long time and offers a variety of snip options:
- Step 1: Press the Start button and search for “Snipping Tool.”
- Step 2: Once the tool opens, click on “New” to start a new screenshot.
- Step 3: Choose your snip mode: Free-form, Rectangular, Window, or Full-screen snip.
- Step 4: Drag your cursor over the area you want to capture.
- Step 5: Once you’ve captured the screenshot, you can save, annotate, or share it.
Read More : http://Laptop Gets Slow When Lid Closed – Causes, Solutions, and Detailed Fixes
2. How to Use Snip & Sketch:
Windows 10 and 11 have largely replaced the Snipping Tool with Snip & Sketch, offering enhanced features like image editing.
- Step 1: Press Windows Key + Shift + S.
- Step 2: Your screen will dim, and you can choose between Rectangular, Freeform, Window, or Full-screen snips.
- Step 3: Once you capture the screenshot, it will appear in the lower-right corner of your screen. Click it to open Snip & Sketch.
- Step 4: From here, you can edit, save, or share your screenshot.
Using Third-Party Screenshot Tools:
If you need advanced features like scrolling screenshots or cloud storage, third-party tools like Lightshot or Greenshot can be helpful. These tools often provide more options for customizing your screenshots and enhancing productivity.
1. Lightshot:

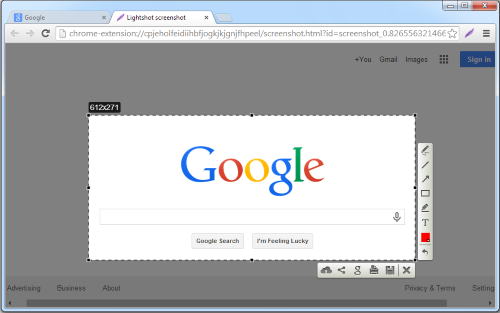
Lightshot is a free and easy-to-use tool for taking quick screenshots and sharing them online.
- Step 1: Download and install Lightshot from its official website.
- Step 2: Press the PrtScn key (Lightshot replaces the default function of this key).
- Step 3: Click and drag to capture the specific area of the screen you want.
- Step 4: Edit or annotate your screenshot directly in Lightshot, then save or upload it to the cloud.
2. Greenshot:
Greenshot is another robust tool for more advanced screenshot needs.
- Step 1: Download and install Greenshot.
- Step 2: Use keyboard shortcuts to capture the screen or part of the screen (Greenshot will guide you).
- Step 3: You can automatically upload the screenshots to cloud services like Dropbox or Imgur.
- Step 4: Annotate, blur sensitive parts, or add highlights as needed before saving.
How to Take a Scrolling Screenshot on ASUS Laptop:
Capturing a long webpage or document in a single screenshot can be tricky with traditional methods.
For this, third-party tools like Snagit or PicPick are recommended.
- Step 1: Install Snagit or PicPick.
- Step 2: Open the webpage or document you want to capture.
- Step 3: Use the “Scrolling Capture” feature to automatically scroll through the page and capture it as a single image.
- Step 4: Edit and save the image as needed.
These tools are great for capturing large amounts of information that won’t fit on your screen at once.
FAQ’s
1. How do I take a full screenshot on an ASUS laptop?
Press the PrtScn key to copy the entire screen to the clipboard or use Windows + PrtScn to save it directly as a file.
2. How do I capture a specific area of the screen?
Press Windows + Shift + S to open Snip & Sketch, allowing you to select and capture a specific part of the screen.
3. Where are screenshots saved on an ASUS laptop?
Screenshots taken with Windows + PrtScn are saved in the “Screenshots” folder under Pictures in your file explorer.
4. Can I screenshot an active window only?
Yes, press Alt + PrtScn to capture just the active window, and then paste it into an app like Paint or Word.
5. What is the best tool for scrolling screenshots on an ASUS laptop?
For scrolling screenshots, use third-party tools like Snagit or PicPick, which capture entire pages or long documents.
Conclusion: Choosing the Right Screenshot Method
Each of the methods described above has its advantages, depending on your needs. For quick screenshots, keyboard shortcuts are your best option. If you need more flexibility, built-in tools like Snip & Sketch or third-party apps provide additional features. Whether you’re capturing entire screens, individual windows, or scrolling pages, your ASUS laptop has a variety of ways to make taking screenshots simple and efficient.


