How To Change Fan Speed On Levovo Laptop – A Complete Guide to Lenovo Laptop Fan Speed!
Learn how to change the fan speed on your Lenovo laptop to prevent overheating using Lenovo Vantage or BIOS settings. Optimize cooling with these simple steps!
In this article, we provide step-by-step instructions on how to change the fan speed on your Lenovo laptop using Lenovo Vantage, BIOS settings, and third-party software. You’ll learn how to optimize cooling and enhance performance effectively. Additionally, we share helpful tips for maintaining your laptop’s health and ensuring a quieter working environment.
Why Adjust Fan Speed?

Before diving into the steps, it’s crucial to understand why you might want to change the fan speed on your Lenovo laptop:
- Prevent Overheating: Overheating can lead to hardware damage and performance throttling. Increased fan speed helps dissipate heat more effectively, protecting internal components.
- Enhance Performance: During resource-intensive tasks like gaming, video editing, or running virtual machines, higher fan speeds can improve performance by maintaining cooler temperatures.
- Reduce Noise: Sometimes, you may want to lower the fan speed for a quieter work environment, especially during light tasks or while watching movies.
- Energy Efficiency: Adjusting the fan speed based on workload can help in conserving battery life, which is particularly beneficial for users on the go.
Method 1: Using Lenovo Vantage
Lenovo Vantage is a user-friendly application designed to manage various system settings, including fan speed. Here’s how to use it effectively:
Step 1: Download Lenovo Vantage
- If you haven’t installed it yet, download Lenovo Vantage from the Microsoft Store. This app is pre-installed on many Lenovo devices but can also be easily obtained if it’s missing.
Step 2: Open the Application
- Launch Lenovo Vantage and sign in if prompted. If you are a new user, you can create an account or skip signing in.
Step 3: Navigate to Thermal Settings
- Click on Hardware Settings located in the left sidebar. Then, select Thermal Management to access fan settings.
Read more :http://Why Is My Fast Forward Not Working Laptop – Causes and Solutions
Step 4: Adjust Fan Speed
- In the Thermal Management section, you will find different performance modes:
- Performance Mode: Increases fan speed for cooling during high-performance tasks, providing maximum airflow.
- Balanced Mode: Offers a good compromise between performance and noise, automatically adjusting fan speed based on current workloads.
- Quiet Mode: Reduces fan speed for a quieter operation, ideal for light tasks or when you need minimal noise.
Step 5: Save Your Settings
- Once you’ve made your selection, close the application. The settings will take effect immediately, but it’s a good practice to monitor system performance afterward.
Method 2: BIOS Settings

Accessing the BIOS (Basic Input/Output System) gives you more control over the fan speed settings. Here’s how to navigate this process:
Step 1: Access BIOS
- Restart your laptop and press the appropriate key (usually F2, Delete, or Esc) during boot to enter BIOS setup. The specific key may vary by model, so refer to your user manual if needed.
Step 2: Navigate to Hardware Monitor
- Use the arrow keys to find the Hardware Monitor, Fan Control, or Advanced section, depending on your BIOS version.
Step 3: Adjust Fan Speed
- Depending on your BIOS version, you might see options to set fan speeds manually or select from predefined profiles:
- Standard Mode: Regular operation suitable for most tasks.
- Turbo Mode: Maximum cooling performance, often with increased fan speeds.
- Custom Mode: Allows you to set specific RPM levels for each fan.
Step 4: Save and Exit
- Make sure to save your changes (usually by pressing F10) before exiting the BIOS. Your laptop will restart with the new fan settings.
Method 3: Using Third-Party Software
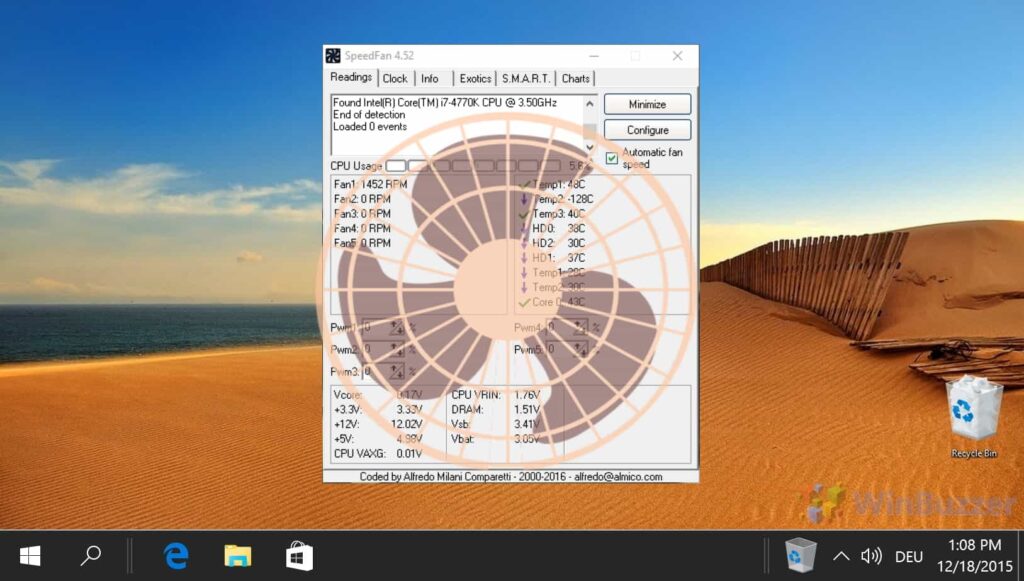
For those who prefer more granular control over fan settings, third-party software can be an excellent option. Popular applications include SpeedFan and HWMonitor. Below, we’ll focus on SpeedFan:
Step 1: Download and Install SpeedFan
- Visit the official SpeedFan website and download the application. Install it on your laptop, ensuring you follow the installation prompts.
Step 2: Launch SpeedFan
- Open the application. It may take a moment to detect all hardware components and sensors.
Read More : http://Why Is Phone Vs Laptop Internet Speed Different – Phone vs. Laptop!
Step 3: Adjust Fan Speed
- Once the application detects your fan, you can manually adjust the speed using sliders:
- Fan Speed Control: Use the sliders to set desired RPM levels for each fan.
- Automatic Control: Enable the automatic control option to let SpeedFan manage fan speeds based on temperature readings.
Step 4: Monitor Temperatures
- SpeedFan provides real-time temperature readings for various components, allowing you to keep an eye on system health. This can help you make informed decisions about fan speed adjustments.
Additional Tips for Managing Fan Speed:

- Keep Your Laptop Clean: Dust buildup can hinder airflow and lead to overheating. Regularly clean the vents and fans using compressed air to ensure optimal performance.
- Monitor System Performance: After making changes to fan settings, monitor your laptop’s performance and temperatures using software like HWMonitor or MSI Afterburner. Adjust settings as necessary based on workload.
- Regular Updates: Ensure your BIOS and Lenovo Vantage software are up to date. Manufacturers often release updates that improve fan control and overall system performance.
- Power Settings: Adjust your power settings through Windows to optimize performance and manage fan speeds based on battery usage.
FAQ’s
1. Can I change the fan speed on all Lenovo laptops?
Most Lenovo laptops allow fan speed adjustments, but the method may vary by model. Using Lenovo Vantage or accessing the BIOS typically provides options for fan control.
2. What is Lenovo Vantage?
Lenovo Vantage is a free application that allows users to manage system settings, including thermal management and fan speed adjustments, enhancing performance and system health.
3. How do I access the BIOS on my Lenovo laptop?
To access the BIOS, restart your laptop and press the appropriate key (usually F2 or Delete) during the boot process. This allows you to change fan settings directly.
4. Is it safe to use third-party software to control fan speed?
Yes, software like SpeedFan is generally safe, but ensure you download it from the official website and monitor your system’s temperatures to avoid overheating.
5. Why is my laptop fan running constantly at high speed?
A constantly running fan may indicate overheating, heavy resource usage, or dust buildup in the vents. Adjusting fan speed settings and cleaning the laptop can help mitigate this issue.
Conclusion:
Changing the fan speed on your Lenovo laptop can significantly impact its performance, noise levels, and overall lifespan. Whether you choose to use Lenovo Vantage, access the BIOS, or leverage third-party software, adjusting fan settings is a straightforward process that can help maintain optimal temperatures and reduce noise levels.


